

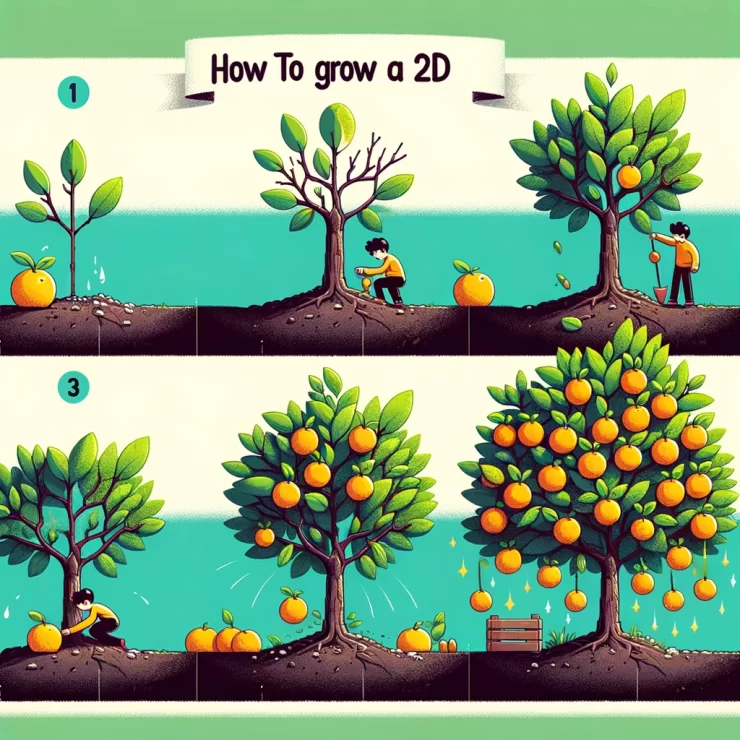
In the world of digital art and design, creating a 2D fruit tree may not seem like a typical endeavor, but it can be a fun and creative project that adds a touch of nature to your digital creations. Whether you’re working on a video game, animation, or simply want to enhance your graphic design skills, learning how to grow a 2D fruit tree can be a valuable skill. In this article, we will guide you through the process of creating your own 2D fruit tree step by step.
Step 1: Choose Your Software
To get started, you’ll need a graphic design software. There are several options available, both free and paid, that are suitable for creating 2D illustrations. Some popular choices include Adobe Illustrator, CorelDRAW, Inkscape (free), and Procreate (for iPad users). Choose the one that you are most comfortable with or are willing to learn.
Step 2: Gather Reference Images
Before you start drawing your 2D fruit tree, it’s a good idea to gather reference images of real fruit trees. This will help you understand the anatomy of a tree and the different parts such as branches, leaves, and fruits. Having references will ensure that your 2D tree looks realistic and natural.
Step 3: Start with the Trunk
Begin by drawing the trunk of your 2D fruit tree. Use a basic shape, such as an elongated rectangle, to create the main body of the trunk. You can add texture and details to make it look like real bark. Experiment with different shades of brown to achieve a realistic appearance.
Step 4: Add Branches
Next, draw the branches extending from the trunk. Branches should taper as they get farther from the trunk. You can create smaller branches that split off from larger ones to give your tree a more natural look. Be sure to vary the angles and directions of the branches to make it look more organic.
Step 5: Draw the Leaves
Now it’s time to add leaves to your 2D fruit tree. Depending on the type of fruit tree you want to create, the leaves may vary in size and shape. Use your reference images to guide you. Common fruit tree leaves include ovate or serrated shapes. Make sure to add veins and texture to the leaves to make them more realistic.
Step 6: Design the Fruits
The most exciting part of creating a fruit tree is designing the fruits. Depending on the type of tree, you can draw apples, oranges, cherries, or any other fruit you like. Use different colors and shapes for the fruits and make sure they are appropriately sized in relation to the leaves and branches.
Step 7: Add Details
To make your 2D fruit tree truly come to life, add some extra details. You can add shadows to the trunk and branches to create depth and dimension. You can also draw small blossoms or flowers to indicate the growth stage of the tree. Experiment with textures and highlights to enhance the overall appearance.
Step 8: Fine-Tune and Edit
Once you’ve completed the basic structure and details, take some time to fine-tune your 2D fruit tree. Pay attention to the overall composition and make any necessary adjustments. You can also play around with the color palette and lighting to achieve the desired mood for your artwork.
Step 9: Save and Export
Once you are satisfied with your 2D fruit tree, save your work in a high-resolution format. This will ensure that you can use it for various projects without losing quality. You can export your artwork in formats such as PNG, JPEG, or even SVG for scalability.
Step 10: Use in Your Projects
Now that you’ve successfully grown your 2D fruit tree, you can incorporate it into your digital projects. Whether it’s a background element in an illustration, a decorative asset in a game, or a part of an animation, your 2D fruit tree will add a touch of nature and creativity to your work.
In conclusion, creating a 2D fruit tree can be a rewarding and enjoyable endeavor in the world of digital art and design. By following these steps and practicing your skills, you can grow your own virtual orchard of beautiful fruit trees. So, grab your preferred graphic design software and start planting the seeds of creativity in your digital world!
Add comment