

As sustainability becomes increasingly important in our daily lives, finding ways to reduce waste and recycle organic materials has become a priority for many. One effective and eco-friendly way to manage kitchen waste is by creating a homemade vermicomposter. Vermicomposting is a natural process that utilizes worms to break down organic matter into nutrient-rich compost. In this article, we’ll guide you through the steps to make your own homemade vermicomposter, helping you reduce waste and create valuable compost for your garden.
Materials Needed
Before you start building your vermicomposter, gather the following materials:
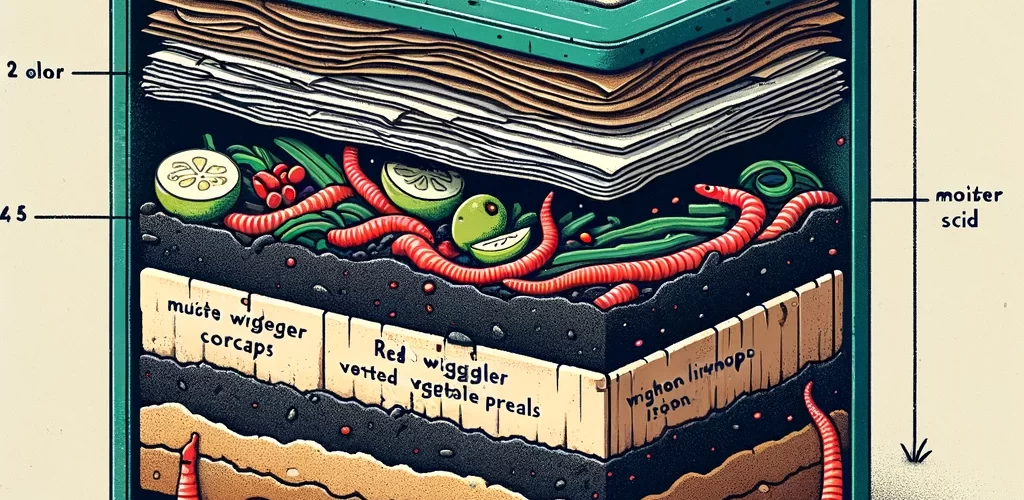
A suitable container: You can use a plastic storage bin, wooden crate, or a specially designed worm composting bin. Ensure it has a lid to keep pests out and holes for aeration.
Bedding materials: Shredded newspaper, cardboard, or coconut coir are excellent choices for bedding. Avoid glossy or colored paper.
Worms: Red wigglers (Eisenia fetida) are the most commonly used worms for vermicomposting. You can purchase them online or at a local garden store.
Organic kitchen scraps: Collect fruit and vegetable scraps, coffee grounds, eggshells, and other organic kitchen waste.
A drill with a 1/4 inch (6 mm) drill bit.
A piece of burlap or old cloth.
Creating Your Homemade Vermicomposter
Follow these steps to create your own homemade vermicomposter:
Prepare the Container:
If your container doesn’t have ventilation holes, use the drill to make small holes in the lid and along the sides near the top for aeration.
Drill a few larger holes in the bottom for drainage. Place a tray or container underneath to catch excess moisture.
Add Bedding:
Line the bottom of the container with a layer of moistened bedding material, about 2-3 inches deep.
Moisten the bedding until it feels like a wrung-out sponge, not too wet or dry.
Introduce the Worms:
Place your red wigglers on top of the bedding.
Cover them with another layer of moistened bedding.
Feed Your Worms:
Start by adding a small amount of kitchen scraps to one corner of the bin.
As the worms adjust and consume the scraps, gradually increase the amount of food.
Maintain the Environment:
Keep the vermicomposter in a cool, dark place, away from direct sunlight.
Ensure the bedding stays moist but not waterlogged. You may need to mist it occasionally.
Cover the bin with a piece of burlap or old cloth to maintain moisture and prevent light from disturbing the worms.
Harvest the Compost:
After a few months, you can start harvesting the rich, dark compost. Push the compost to one side of the bin, and add fresh bedding and food scraps to the other side.
The worms will migrate to the side with fresh food, leaving behind the finished compost.
Benefits of Vermicomposting
Creating a homemade vermicomposter offers numerous benefits:
Reduces kitchen waste: Vermicomposting helps divert organic waste from landfills, reducing methane emissions.
Produces nutrient-rich compost: The worm castings (excrement) are an excellent organic fertilizer for your garden.
Saves money: You can produce your own compost, eliminating the need to purchase commercial fertilizers.
Teaches sustainability: Vermicomposting is an educational and sustainable practice that can be shared with family and friends.
A homemade vermicomposter is a simple yet effective way to manage kitchen waste while promoting sustainability. By following these steps and maintaining your vermicomposter, you can create nutrient-rich compost for your garden and contribute to a greener, more eco-friendly future. So, start your vermicomposting journey today and watch as your kitchen scraps transform into valuable, organic fertilizer for your plants.

Add comment