Keeping your vegetable garden hydrated is essential for healthy plant growth, but manually watering can be time-consuming and prone to inconsistency. Fortunately, with a little DIY ingenuity, you can create an automatic vegetable waterer using a simple plastic bottle. This cost-effective solution ensures your plants receive the moisture they need while saving you time and effort in the process.
Materials Needed:
Plastic bottle (1 or 2-liter works well)
Sharp knife or scissors
Drill or push pin
Nylon string or cotton twine
Watering can or hose
Potting soil (optional)
Step 1: Prepare the Bottle
Start by removing any labels and cleaning the plastic bottle thoroughly. Ensure it’s completely dry before proceeding. Then, using a sharp knife or scissors, carefully cut off the bottom of the bottle. This will serve as the reservoir for the water.
Step 2: Create Watering Holes
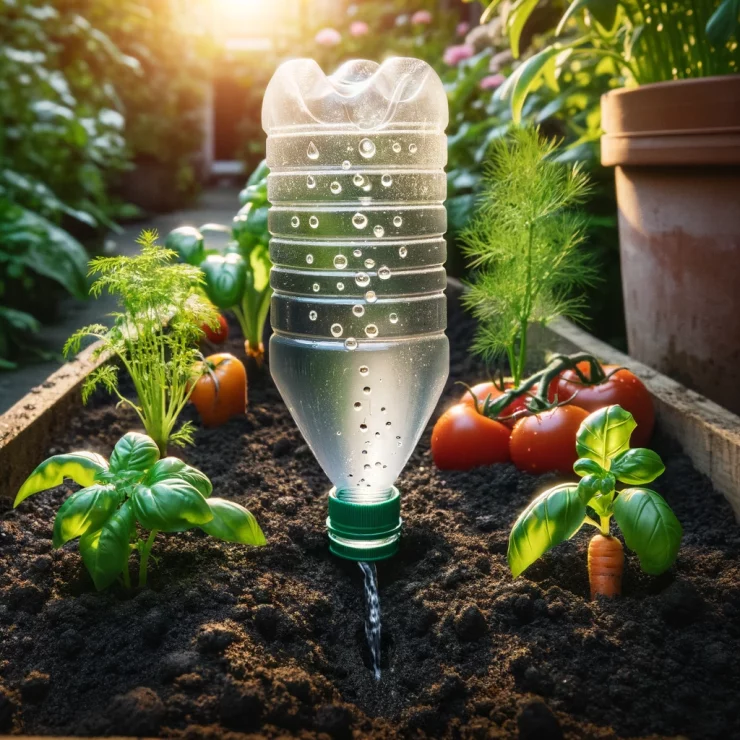
With the bottle positioned upside down, use a drill or push pin to make small holes in the cap end of the bottle. These holes will allow water to slowly drip out and irrigate the soil. Make sure the holes are small enough to control the flow of water.
Step 3: Attach String for Capillary Action
Cut a piece of nylon string or cotton twine long enough to reach from the bottom of the bottle to the soil in your vegetable garden. Thread one end of the string through the cap of the bottle and secure it in place. This string will act as a wick, drawing water from the bottle to the soil through capillary action.
Step 4: Bury the Bottle
Dig a hole in the soil near the base of your vegetable plants, making sure it’s deep enough to accommodate the bottle. Place the bottle upside down in the hole, ensuring the cap with the string is buried securely in the soil.
Step 5: Fill the Bottle and Test
Fill the plastic bottle with water using a watering can or hose. Once filled, replace the cap tightly. The water should begin to slowly drip out of the holes in the cap. Adjust the tightness of the cap or the size of the holes if necessary to control the flow of water.
Step 6: Monitor and Refill as Needed
Monitor the water level in the bottle regularly and refill as needed to ensure a consistent water supply to your vegetable plants. Depending on the size of the bottle and the water requirements of your plants, you may need to refill every few days or as needed.
By following these simple steps, you can create an automatic vegetable waterer using a plastic bottle, ensuring your garden stays hydrated and thriving with minimal effort. This DIY solution is not only cost-effective but also environmentally friendly, making it a win-win for both you and your plants.


Add comment