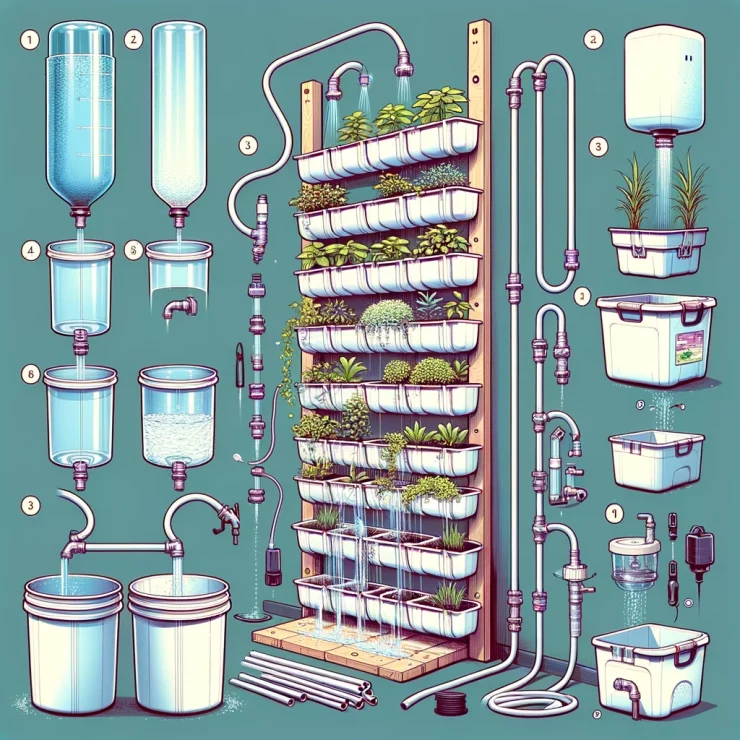
Vertical gardening has gained immense popularity in recent years due to its space-saving capabilities and aesthetic appeal. However, keeping these gardens adequately watered can be a challenge, especially for those with busy schedules or limited access to water sources. Fortunately, a self-watering vertical garden irrigation system offers a convenient solution to this problem. In this guide, we will walk you through the process of creating your very own self-watering system for your vertical garden.
Materials Needed:
PVC pipes (1-2 inches in diameter)
End caps for PVC pipes
PVC pipe fittings (elbows, tees, connectors)
Drill with drill bits
Waterproof adhesive
Plastic containers or buckets
Water reservoir (such as a large plastic container or rain barrel)
Watering hose
Soil
Plants
Step 1: Design Your System
Begin by planning the layout of your vertical garden and determining where you want to place your irrigation system. Consider the size of your garden, the number of plants you have, and the available space for the water reservoir.
Step 2: Prepare the PVC Pipes
Cut the PVC pipes to the desired lengths according to your garden’s dimensions. You will need one vertical pipe for each row of plants and one horizontal pipe for each level. Drill holes along the length of the vertical pipes using a drill bit suitable for your plant size and watering needs. These holes will allow water to drip down to each plant.
Step 3: Assemble the Pipes
Attach the PVC fittings to connect the vertical and horizontal pipes, creating a grid-like structure. Ensure that the pipes are securely connected to prevent leaks. Cap the ends of the vertical pipes to contain the water within the system.
Step 4: Install the Water Reservoir
Place the water reservoir at the base of your vertical garden. This could be a plastic container or a rain barrel connected to a hose for easy refilling. Make sure the reservoir is stable and level to prevent tipping.
Step 5: Connect the Pipes to the Reservoir
Using waterproof adhesive, attach the watering hose to the top horizontal pipe of your system. This hose will deliver water from the reservoir to the top of the garden, allowing it to trickle down through the PVC pipes and hydrate your plants.
Step 6: Fill with Soil and Plant Your Garden
Fill each planting pocket with soil and plant your chosen vegetation. Make sure the soil is evenly moist before installing it in the vertical garden to ensure proper hydration for your plants.
Step 7: Test and Adjust
Turn on the water supply and observe how water flows through your irrigation system. Make any necessary adjustments to the water flow or pipe placement to ensure that each plant receives an adequate amount of water.
Step 8: Monitor and Maintain
Regularly check your self-watering vertical garden irrigation system to ensure it is functioning correctly. Refill the water reservoir as needed and inspect the pipes for any signs of damage or clogging. With proper maintenance, your self-watering system will keep your vertical garden thriving with minimal effort.
By following these simple steps, you can create a self-watering vertical garden irrigation system that will keep your plants healthy and vibrant all year round. Enjoy the beauty of your vertical garden without the hassle of constant watering, and watch as your plants flourish in their new, self-sustaining environment.


Add comment