

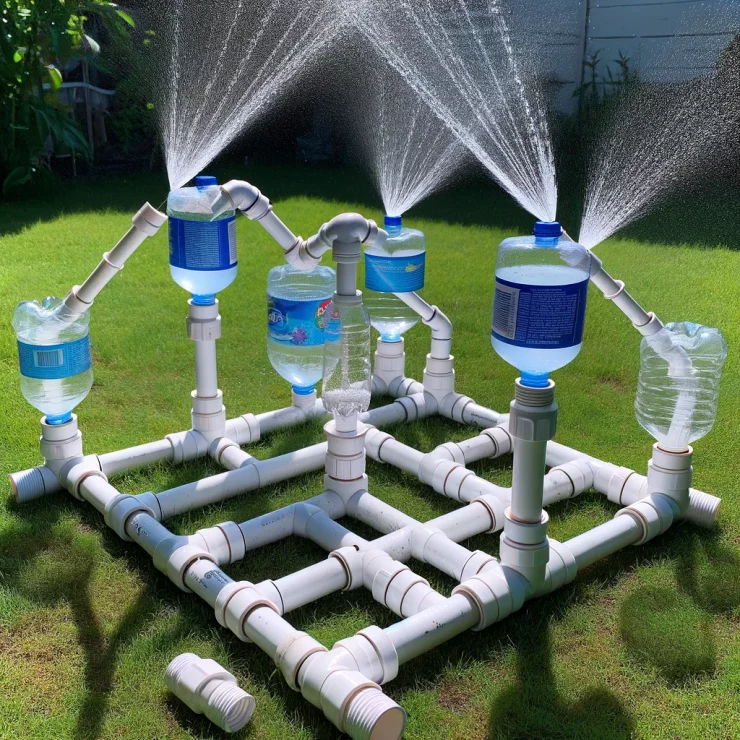
Looking to cool off your backyard on a scorching summer day without breaking the bank? A homemade PVC and bottle water sprinkler might just be the solution you’re looking for. With just a few inexpensive materials and some creativity, you can create a refreshing oasis right in your own backyard. In this guide, we’ll walk you through the step-by-step process of making your own DIY water sprinkler using PVC pipes and recycled plastic bottles.
Materials Needed:
PVC pipes (½ inch diameter)
Plastic bottles (various sizes)
PVC pipe fittings (elbows, tees, connectors)
PVC pipe cutter or hacksaw
Drill with drill bits
Waterproof adhesive or glue
Hose connector or adapter
Hose
Water source
Step 1: Prepare Your Materials
Gather all the materials listed above. Make sure your PVC pipes are clean and free of any debris. Select plastic bottles of various sizes to create different spray patterns for your sprinkler.
Step 2: Cut the PVC Pipes
Using a PVC pipe cutter or hacksaw, cut the PVC pipes into the desired lengths for the main body of your sprinkler. Consider the size of your backyard or garden area when determining the length of the pipes.
Step 3: Drill Holes in the PVC Pipes
Using a drill with drill bits, carefully drill holes along the length of the PVC pipes. The size and spacing of the holes will determine the water spray pattern, so feel free to get creative here. You can drill smaller holes for a misting effect or larger holes for a more substantial spray.
Step 4: Attach the PVC Pipe Fittings
Assemble the PVC pipes and fittings to create the structure of your sprinkler. Use elbows, tees, and connectors to build a sturdy frame. Make sure everything fits together snugly.
Step 5: Attach the Plastic Bottles
Using waterproof adhesive or glue, attach the plastic bottles to the top of the PVC pipes. These bottles will serve as reservoirs for the water and help to increase the pressure of the water flow.
Step 6: Connect the Hose
Attach a hose connector or adapter to one end of the PVC pipe assembly. This will allow you to connect your sprinkler to a standard garden hose.
Step 7: Test Your Sprinkler
Connect the hose to your water source and turn on the water. Adjust the flow as needed to achieve your desired spray pattern. Watch as your homemade PVC and bottle water sprinkler comes to life, providing a refreshing mist to cool off your outdoor space.
With just a few simple materials and some basic DIY skills, you can create a homemade PVC and bottle water sprinkler that’s both cheap and easy to make. Not only is it a fun project to tackle on a lazy afternoon, but it also provides a practical solution for keeping your backyard cool during the hot summer months. So why wait? Grab your materials and get started on your DIY water sprinkler today!
Add comment