

Are you tired of taking plant cuttings only to watch them wilt, rot, or dry out before they ever push out a single root? Propagation is the best way to expand your garden for free, but it can be frustrating when it fails.
Forget expensive rooting hormones or complicated misting systems. The secret to rapid, healthy root development is likely sitting in your kitchen drawer right now.
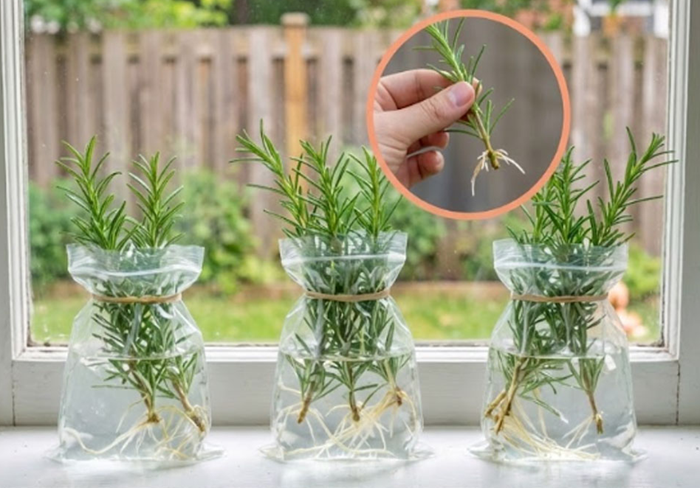
As seen in the photos above, the “simple trick” to fast rooting is swapping out standard open-top jars for humble plastic bags. Whether you are rooting herbaceous herbs like rosemary on a windowsill or thicker woody stems in a tub outdoors, this method is a game-changer.
Why The “Plastic Bag Trick” Works
Looking at the success shown in the images, it’s clear this method yields results. Here is why this low-cost hack works so well:
1.The Mini-Greenhouse Effect
The biggest challenge for a fresh cutting is hydration. Without roots, it cannot take up water efficiently, yet it is constantly losing moisture through its leaves. By placing the cutting inside a clear plastic bag, you create a sealed, high-humidity environment. This stops the leaves from wilting, allowing the plant to focus its energy on root production rather than survival.
2.Zero Evaporation
When propagating in open glasses on a sunny windowsill, water evaporates quickly, requiring constant refilling. As shown in the top photo, the secured plastic bags prevent water loss. The water level stays consistent, ensuring the bottom of the stem is always submerged.
3.Space-Saving Mass Propagation
As seen in the bottom photo, this method allows you to propagate many large cuttings in a small footprint. You don’t need dozens of individual jars; you can cluster several bagged cuttings together in a single tub or bucket.
How to Do It: A Simple Step-by-Step
Ready to try the trick shown in the photos? Here is how to replicate those results:
Take Your Cutting: Snip a 4-6 inch section of your desired plant (like the rosemary shown above). Remove the leaves from the bottom 2 inches of the stem.
Prepare the Bag: Take a small, clear plastic sandwich bag or poly bag. Fill the bottom corner with just enough water to cover the submerged part of the stem (about 1-2 inches).
Insert and Secure: Place the cutting into the water. Gather the top of the bag around the stem of the plant, above the waterline but below the remaining leaves. Secure it gently but firmly with a rubber band or twist tie.
Placement: Set your bagged cuttings in a bright area but out of direct, harsh sunlight. A windowsill that gets morning light (as pictured) is perfect.
When to Transplant
The clear bags make it easy to monitor progress without disturbing the plant. Once you see vigorous white roots that are 1 to 2 inches long—like the impressive root system on the woody stem held in the hand in the bottom photo—your cutting is ready to be potted into soil.
Give this simple trick a try on your next batch of cuttings. You’ll be amazed at how quickly your plant collection grows.
Add comment