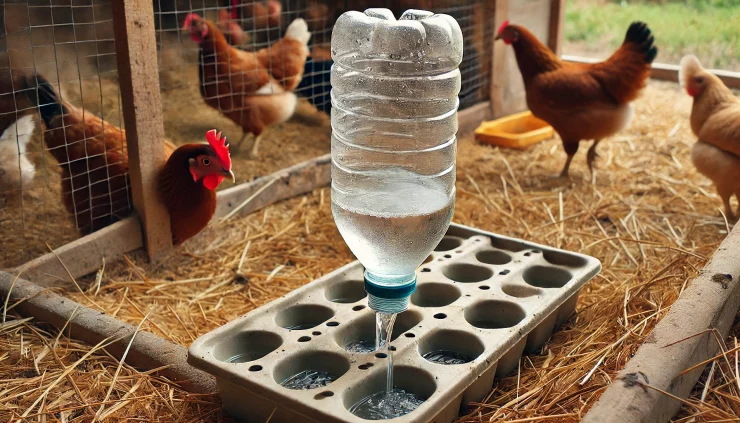
Keeping your chickens hydrated is essential for their health and productivity. An automatic chicken waterer ensures that your chickens have access to fresh water at all times, reducing your daily maintenance tasks. One of the simplest and cost-effective ways to create an automatic waterer is by using a plastic bottle. Here’s a step-by-step guide to help you build one.
Materials Needed
A large plastic bottle (1-2 liters)
A water tray or shallow dish
Drill with a small bit or a sharp knife
Rubber grommet or silicone sealant (optional)
Wire or string for hanging (optional)
Scissors
Step-by-Step Instructions
Prepare the Plastic Bottle
Clean the Bottle: Wash the plastic bottle thoroughly to remove any residues that might contaminate the water.
Remove Labels: If there are any labels on the bottle, peel them off to ensure a clear view of the water level.
Create Water Outlet Holes
Mark the Holes: Using a marker, draw two small dots near the base of the bottle. These will be your water outlet holes.
Drill the Holes: Carefully drill two small holes (about 1/8 inch) at the marked spots. Make sure the holes are at the same height and close to the bottom of the bottle but above the base.
Attach the Water Tray
Position the Tray: Place the water tray or shallow dish under the bottle so that the holes you drilled are just above the edge of the tray.
Secure the Bottle: If you prefer, you can use wire or string to hang the bottle above the tray. Ensure the bottle is stable and will not tip over.
Seal the Holes (Optional)
Rubber Grommet or Silicone Sealant: To prevent any leaks and ensure a consistent water flow, you can use a rubber grommet or apply silicone sealant around the drilled holes. Allow the sealant to dry completely before using the waterer.
Fill the Bottle with Water
Fill the Bottle: Unscrew the cap and fill the bottle with clean, fresh water.
Secure the Cap: Screw the cap back on tightly to create a vacuum inside the bottle, which will help regulate the water flow.
Test the Waterer
Check Water Flow: Place the waterer in its designated spot and observe how the water flows into the tray. The water should flow out of the holes until it reaches the level of the holes, then stop. As the chickens drink and the water level drops, more water should flow out to maintain the level.
Tips for Success
Regular Cleaning: Clean the waterer regularly to prevent algae and bacteria buildup. Rinse the bottle and tray thoroughly with clean water.
Stable Placement: Ensure the waterer is placed on a stable, flat surface or securely hung to prevent spills and tipping.
Check for Leaks: Periodically check the waterer for leaks, especially around the drilled holes. Reapply sealant if necessary.
Winter Use: In colder climates, ensure the water does not freeze. Consider bringing the waterer indoors overnight or using a heated water tray.
Benefits of an Automatic Chicken Waterer
Constant Supply: Ensures that your chickens have a continuous supply of fresh water, essential for their health and productivity.
Time-Saving: Reduces the time and effort required to refill water containers multiple times a day.
Hygienic: Keeps the water cleaner by preventing contamination from dirt, bedding, and chicken droppings.
Building an automatic chicken waterer using a plastic bottle is a simple and cost-effective way to ensure your chickens always have access to fresh water. With just a few basic materials and some simple steps, you can create a reliable waterer that will make your daily chores easier and keep your flock happy and healthy. Give it a try and enjoy the benefits of a well-hydrated and productive flock.


Add comment