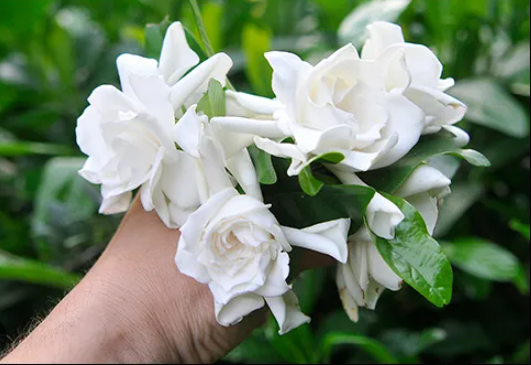
Gardenias are prized for their beautiful, fragrant blooms and glossy evergreen leaves, making them a popular choice for gardens and landscapes. Propagating gardenias from cuttings is an excellent way to expand your collection or share the beauty of this plant with others. While gardenias can be a little finicky, with the right technique and care, you can successfully grow new plants from cuttings.
This guide provides a step-by-step process for propagating gardenias from cuttings and tips for ensuring your new plants thrive.
When to Take Gardenia Cuttings
The best time to take gardenia cuttings is during the early summer when the plant is actively growing. Choose a day when the plant is hydrated, preferably in the morning when the plant is full of moisture. Look for semi-hardwood cuttings, which are sections of the stem that are firm but still flexible, and have not yet matured into wood.
What You Will Need:
A healthy gardenia plant
Sharp pruning shears or scissors
Rooting hormone (optional but recommended)
Potting mix or seed-starting mix
Small pots or trays
Plastic bag or humidity dome
Spray bottle filled with water
A well-lit, warm spot (but out of direct sunlight)
Step-by-Step Guide to Propagating Gardenias from Cuttings
Step 1: Prepare the Potting Mix
Before you take your cuttings, prepare your pot or tray with a well-draining potting mix or seed-starting mix. Moisten the mix so that it’s damp but not waterlogged. Gardenias prefer acidic soil, so using a potting mix designed for acid-loving plants can be beneficial.
Step 2: Take the Cutting
Use sharp, clean pruning shears or scissors to take a cutting from the gardenia plant. Choose a healthy branch that is free of diseases or pests.
Cut a 4-6 inch section just below a leaf node (where the leaf attaches to the stem). A node is where new roots will form.
Remove the lower leaves from the cutting, leaving just a few leaves at the top. If the remaining leaves are large, you can cut them in half to reduce water loss through transpiration.
Step 3: Apply Rooting Hormone (Optional)
While gardenia cuttings can root without rooting hormone, using it can increase the chances of success. Dip the cut end of the cutting into rooting hormone powder or gel. This will encourage faster root development.
Step 4: Plant the Cutting
Insert the cutting about 1-2 inches deep into the prepared potting mix. Firm the soil around the base of the cutting to keep it stable.
If you’re propagating multiple cuttings, ensure they are spaced apart so they have good airflow around them.
Step 5: Create a Humid Environment
Gardenia cuttings need a humid environment to thrive while they develop roots. Place a plastic bag over the pot or use a humidity dome to trap moisture around the cutting. Make sure the plastic does not touch the cutting directly—use stakes or wire hoops if necessary to keep the plastic elevated.
Alternatively, you can mist the cuttings frequently with a spray bottle to keep the humidity high around the plants.
Step 6: Place the Cutting in Indirect Light
Place the potted cutting in a warm, bright location, but avoid direct sunlight, which can scorch the tender cutting. A temperature of about 70-75°F (21-24°C) is ideal for rooting gardenias. A sunny windowsill with filtered light or under grow lights is perfect.
Step 7: Water as Needed
Keep the soil slightly moist at all times but not soggy. Gardenia cuttings can be sensitive to too much water, which can lead to rot. Mist the soil lightly if it dries out, and avoid overwatering.
Care Instructions for Gardenia Cuttings
1.Check for Root Growth
After 4-8 weeks, gently tug on the cutting to see if there is resistance, which indicates that roots have begun to form. Once you feel resistance, it’s a sign that the cutting has rooted successfully.
2.Transplanting
Once the cutting has developed a healthy root system, it is time to transplant it into its own pot with acidic, well-draining potting soil (gardenia-friendly soil). Be gentle when transplanting to avoid damaging the fragile new roots.
3.Gradual Acclimation
If the cutting has been under a plastic bag or dome, gradually acclimate it to the outside air. Remove the plastic for a few hours a day, increasing the time each day until the plant no longer needs the covering.
4.Watering and Humidity
Gardenias love humidity, so keep the soil moist and mist the leaves regularly to mimic their natural environment. Avoid letting the soil dry out completely, but also avoid waterlogging, as gardenias are susceptible to root rot.
5.Fertilizing
After the cutting has rooted and started to grow, feed it with a fertilizer designed for acid-loving plants (such as azaleas or rhododendrons). Follow the manufacturer’s instructions for application rates.
6.Provide the Right Light
Gardenias need bright, indirect light for optimal growth. If indoors, place them near a bright window but avoid direct afternoon sun. Outdoors, gardenias prefer morning sun and dappled shade in the afternoon.
7.Watch for Pests
Keep an eye out for common gardenia pests such as aphids, mealybugs, and spider mites. Regularly inspect the leaves and treat any infestations with insecticidal soap or neem oil.
Common Mistakes to Avoid
Overwatering: Too much water can lead to root rot, so always ensure the soil is moist but not soggy.
Excessive Direct Sunlight: While gardenias love light, direct sun can scorch the tender cuttings. Keep them in bright, indirect light.
Neglecting Humidity: Gardenias thrive in humid environments. Ensure that your cutting has enough humidity, especially during the early stages of propagation.
Not Using Clean Tools: Always use sterilized pruning tools when taking cuttings to avoid introducing disease to the plant.
Propagating gardenias from cuttings can be a rewarding process if done with care and patience. By following the steps outlined in this guide, you can increase your chances of success and enjoy the beauty of new gardenia plants in your home or garden. With proper care, your propagated gardenias will grow into healthy, beautiful shrubs, rewarding you with their delightful fragrance and stunning blooms for years to come.


Add comment