A keyhole garden is a compact, raised-bed garden designed for efficient water use, easy access, and optimal composting. Originally popularized in drought-prone regions of Africa, this unique garden layout is ideal for growing vegetables, herbs, and other plants in small spaces with minimal resources. Here’s a step-by-step guide to building your own keyhole garden.
What You’ll Need
- Garden space (about 6 feet in diameter is common)
- Bricks, stones, or wood for the outer wall
- Wire mesh or fencing (optional for extra support)
- Organic materials such as sticks, straw, compost, cardboard, and leaves
- Soil and compost mix
- Cardboard or newspaper for weed suppression
- Seeds or seedlings of your choice
- Watering can or hose
Step 1: Choose a Location
Select a location that receives plenty of sunlight throughout the day, as this will be essential for growing vegetables and herbs. Ideally, pick a spot near your kitchen or water source for easy maintenance and harvesting.
Step 2: Plan and Mark the Shape
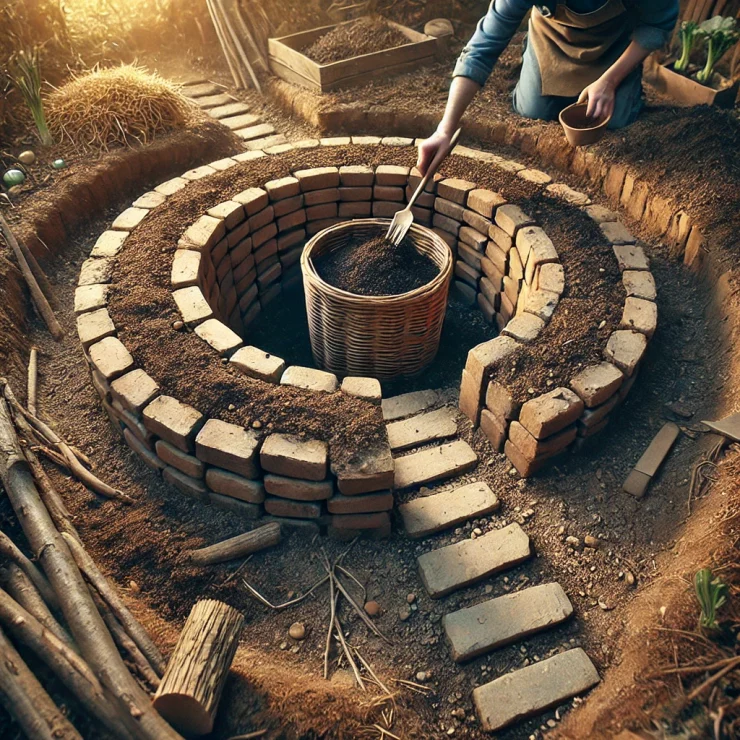
Keyhole gardens are circular in shape, with a small “keyhole” or path that allows easy access to the center.
- Mark the center of your garden area and use a stick or stake as the focal point.
- Using a string tied to the center stick, mark a circular boundary (about 3 feet in radius).
- Leave a small wedge shape (like a slice of pie) to form the keyhole path leading to the center. This is where you will access the compost basket.
Step 3: Build the Outer Wall
Construct a raised wall around the marked circle using bricks, stones, or wood.
- The wall should be about 2 to 3 feet high to retain soil and create the raised bed.
- Make sure the wall is sturdy and well-secured. You can use mortar for added stability if desired, especially if using bricks or stones.
The raised wall will help retain moisture, prevent soil erosion, and keep pests out of the garden.
Step 4: Create the Central Compost Basket
The compost basket is the heart of the keyhole garden, where you’ll place compostable materials to nourish the surrounding plants.
- Place a smaller circular structure (like a wire mesh cylinder) in the center of the garden.
- Secure the cylinder in place; this should be about 1 foot in diameter and as tall as the outer wall.
- Fill the basket with compostable materials like vegetable scraps, leaves, and coffee grounds.
Over time, this compost basket will break down, providing nutrients to the plants in the surrounding garden bed.
Step 5: Layer the Base of the Garden
Keyhole gardens are known for their “lasagna” layering technique, which helps retain moisture and improve soil fertility.
- First Layer: Start with a base layer of coarse materials like small branches or sticks to create drainage.
- Second Layer: Add a layer of cardboard, newspaper, or straw to suppress weeds and retain moisture.
- Third Layer: Add a layer of leaves, grass clippings, or other green organic matter.
- Final Layer: Add a thick layer of soil mixed with compost on top, filling up to the edge of the outer wall.
This layering will encourage water retention, reduce the need for frequent watering, and enrich the soil.
Step 6: Plant Your Garden
Now it’s time to plant!
- Arrange your plants based on their water needs, with more water-loving plants closer to the compost basket.
- Place herbs, vegetables, or flowers in the soil, leaving some space for growth.
- Popular plants for keyhole gardens include leafy greens, tomatoes, herbs, peppers, and root vegetables.
Step 7: Maintain the Compost Basket
To keep your garden thriving, regularly add compostable materials to the central basket. Avoid adding meat, dairy, or oily foods to the compost, as these can attract pests and take longer to break down.
- Water the compost basket when you water your plants, as this helps distribute nutrients to the surrounding soil.
- Turn or stir the compost occasionally to promote decomposition.
Step 8: Water Wisely
Keyhole gardens are designed to use water efficiently, but you should still monitor moisture levels, especially in dry climates.
- Water directly into the compost basket to distribute water throughout the soil.
- During hot weather, consider adding a layer of mulch on top of the soil to prevent moisture evaporation.
Step 9: Harvest and Enjoy
As your plants grow, harvest vegetables and herbs as needed. Since the garden is raised and accessible, harvesting is easy, and you can continue adding to the compost basket as you go.
Additional Tips
- Rotate Crops: Change the types of plants you grow each season to maintain soil health and prevent nutrient depletion.
- Use Mulch: Add mulch around plants to help retain moisture and reduce weeds.
- Regular Composting: Keep feeding the compost basket to provide a continuous nutrient source for your garden.
Building a keyhole garden is a rewarding way to grow your own food sustainably, especially if you have limited space or water. This garden structure not only saves water and requires minimal maintenance but also provides a rich, nutrient-dense environment for plants to thrive. Enjoy the benefits of this unique and efficient gardening method!


Add comment