

 wawstock
The Christmas cactus (Schlumbergera) is one of the easiest houseplants to propagate, yet many people never realize how simple the process can be. A small cutting containing just a few healthy segments can eventually develop into a completely new plant.
With the right cutting, a light potting mix, and a little patience, you can turn one mature Christmas cactus into several new plants without buying anything special.
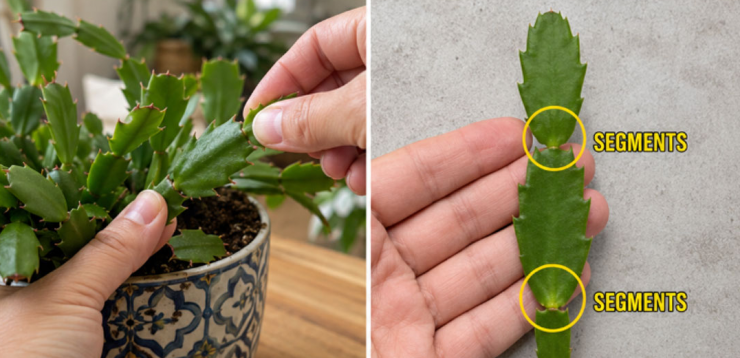
Unlike desert cacti, Christmas cactus naturally grows in humid forest environments, where it often develops among tree branches and organic debris. Its flattened green stems are divided into individual segments connected at small joints.
These joints are important because new roots can develop near the base of a healthy cutting.
Propagation is especially useful when you want to:
Create new plants from an older Christmas cactus.
Make inexpensive gifts for friends and family.
Rejuvenate a plant that has become too large or uneven.
Save healthy sections from a damaged plant.
Encourage the parent plant to become fuller and bushier.
The Best Time to Take Christmas Cactus Cuttings
Christmas cactus can be propagated during much of the year, but spring and early summer are usually excellent times because the plant is entering an active period of growth.
If possible, wait until flowering has finished before taking several cuttings. This allows the plant to direct more energy toward root and shoot development.
Step 1: Choose Healthy Stem Segments
Look for firm, healthy green growth without soft spots, discoloration, pests, or disease.
A useful cutting usually contains around 2 to 4 connected segments.
Avoid taking extremely long pieces. Smaller cuttings are easier to handle and generally lose less moisture while developing roots.
Step 2: Separate the Cutting at a Joint
Hold the stem gently and twist the selected section where two segments meet.
Christmas cactus segments usually separate quite easily at their natural joints.
You can also use clean scissors or pruning shears, but separating the stem at the joint often creates a convenient propagation cutting.
Do not crush or badly damage the base of the cutting.
Step 3: Let the Cutting Rest Briefly
After removing the cutting, allow the cut end to dry for several hours or overnight.
This short resting period allows the wound to begin drying before the cutting is placed in moist soil.
Unlike many desert cacti, Christmas cactus cuttings generally do not need to remain dry for many days.
Step 4: Prepare a Light Potting Mix
Good drainage is extremely important.
Use a loose, airy mix rather than dense garden soil. A suitable combination might contain:
Indoor potting mix
Perlite
Fine orchid bark or another airy organic material
The goal is to keep some moisture around the developing roots while still allowing plenty of oxygen into the soil.
Small pots or seed-starting containers work very well.
Step 5: Plant the Cutting
Insert the bottom portion of the cutting gently into the potting mixture.
Usually, only the lower part of the first segment needs to be buried. There is no reason to plant the cutting deeply.
Firm the soil gently around it so the cutting remains upright.
Several cuttings can also be planted together in a larger container if you want the future plant to look fuller.
Step 6: Water Carefully
Lightly moisten the soil after planting.
The soil should remain slightly moist but never permanently soaked.
One of the most common propagation mistakes is overwatering. A cutting without an established root system cannot use large quantities of water, and constantly saturated soil can encourage rot.
Allow the upper part of the potting mix to begin drying slightly before watering again.
Step 7: Provide Bright, Indirect Light
Place the cuttings somewhere with plenty of bright, indirect light.
Avoid intense afternoon sunlight while the new plants are becoming established. Excessive direct sun can cause stress and moisture loss.
A bright windowsill protected from harsh midday or afternoon sunlight can work very well.
How Long Does Rooting Take?
Under warm conditions with adequate light and moderate moisture, Christmas cactus cuttings often begin developing roots within a few weeks.
You may notice new growth before you ever see the roots.
One of the clearest signs of successful propagation is the appearance of a new green segment emerging from the tip of the cutting.
Avoid repeatedly pulling the cutting out of the soil to check for roots. Doing so can damage the tiny developing root system.
Growing Cuttings in Water
Christmas cactus can sometimes also be rooted in water.
Place only the very bottom of the cutting close to or slightly in the water while keeping most of the stem above the surface.
Once a small root system has developed, the cutting can be transferred into potting mix.
However, planting directly into a light soil mixture is often simpler because the young plant does not need to adapt from water-grown roots to soil afterward.
How to Make the New Plant Fuller
If your goal is a dense, attractive Christmas cactus, plant several rooted cuttings together.
One cutting will eventually branch, but combining several cuttings can produce a fuller plant much faster.
As the plant grows, occasional pruning can also encourage branching.
Interestingly, every healthy piece you remove during pruning can potentially become another plant.
Common Propagation Mistakes
Using unhealthy cuttings
Soft, yellow, damaged, or diseased sections are much less likely to establish successfully.
Always start with healthy green growth.
Planting too deeply
Christmas cactus cuttings do not need to be buried far into the soil.
Deep planting increases the amount of stem exposed to constant moisture and can encourage rot.
Overwatering
More water does not mean faster rooting.
Keep the mixture lightly moist rather than wet.
Using heavy garden soil
Dense soil holds too much moisture around the cutting.
An airy potting mixture containing perlite or similar material is much safer.
Giving the cutting too much direct sun
Fresh cuttings can become dehydrated before they develop enough roots to replace lost moisture.
Bright indirect light is usually preferable during the early rooting period.
Caring for the Young Christmas Cactus
Once the cutting begins producing new segments, care for it increasingly like an established Christmas cactus.
Provide:
Bright indirect light.
Well-draining soil.
Moderate watering.
Good airflow.
A pot with drainage holes.
Christmas cactus prefers slightly more moisture than many traditional desert cacti, but its roots still dislike waterlogged soil.
As the root system develops, the plant will gradually become more tolerant of normal watering.
The remarkable part of Christmas cactus propagation is how little plant material is required.
A cutting that initially consists of only a few green segments can gradually branch, expand, and eventually become a large plant capable of producing dozens of colorful flowers.
This makes Christmas cactus one of the most rewarding houseplants to propagate at home.
Instead of throwing away healthy pieces that break off during pruning or repotting, place them in a light potting mix. With proper moisture, warmth, and indirect light, those small segments may become the next generation of Christmas cactus plants.


Add comment